Nowadays, a lot of people are using Authorize.Net to accept payments online on their websites. To make things easier, WPForms comes here with the Authorize.Net add-on, which makes connecting payments and payment forms super simple.
Authorize.Net payment form in WordPress now makes it easy to accept credit card payments on your website.
So let’s talk about this add-on…
Contents
Simple payment forms integration
Authorize.net helps small businesses accept credit cards, debit cards and check electronic transactions on the website and over an internet protocol (IP) connection. Authorize.Net is a united states -based payment gateway service provider that helps and enables the merchants to accept payment in online mode.
It is an established payment processor that carries the submission of billions of transactions of various customers. With the help of the Authorize.Net add-on, you can use an authorize.net account to accept credit card payments using your forms with WPForms.
- Helps in fraud prevention– there is a proper fraud prevention system in Authorize.net. Here, 13 filters are available, which you can use to create a fraud prevention system corresponding to your business needs. Filters also can be set up to verify whether the billing and shipping address matches. If there is any mismatch, then stop the transaction.
- Customer data security– while playing online, many data stores, like customer’s name and credit card details. To protect this data, Authorize.Net applies advanced security mechanisms. The details of credit cards are store on secured servers.
- Acceptance of all major credit cards and payments services– you can use any popular credit card and payment services-Mastercard, visa, American Express, PayPal, and many more when you have set up Authorize.Net as a payment method. It also enables to accept e-check and various mobile options.
- Customer information managers and customer profiles-customer des do not need to re-enter the credit card data if they wish to use the same card because of Authorize.Net allows processing so-called “recurring payment” using the data of previous transactions. It stores the payment information and the shipping address that can be used to populate the order from subsequent purchases. Customers can also update the data when necessary.
- Mobile in-app transactions– the customer using a mobile app, there is an opportunity for them to enable credit card processing within the application. There is no need to forward credit card detail in the mobile app, so this feature provides excellent protection to their customer.
- Transaction reporting- another feature of Authorize.Net is that it helps monitor the transaction payments and analyze various transaction-related data. When you install the Authorize.Net payment method, you get a complete transaction with its detail.
How to install Authorize.Net Addon with WPForms
In this post, I’ll tell you how to install and set up the theAuthorize.Net add-on with WPForms.
1. Firstly you have to install WPForms on your WordPress site; .then, you can go head install and activate the authorize.net add-on.
2. You are connecting authorize.Net to your word press site- when your Authorize.Net add-on is active on the site. You have to go to the WPForms setting, which is present in the left menu of your WordPress site. Then you have to click on the payment tab. You can also change the currency according to your payment form.
3. After that, you have to scroll the section labelled Authorize.Net.For connecting to your site to your Authorize.Net, and you have to add the API Login ID and Transaction key so that your site is connected to your Authorize.Net account.
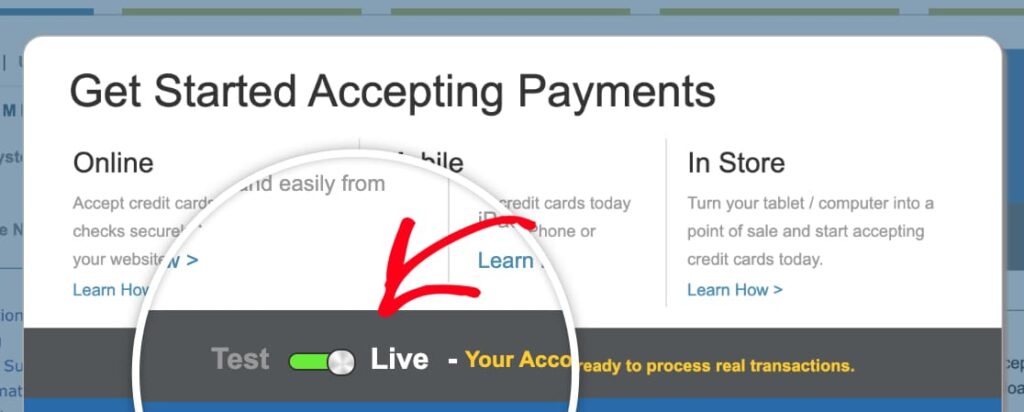
4. Signing in to authorize.net – if you do not have an authorize.net account, you first have to create the account. When you log in to the account, make sure that your account is set to live. Now you can get the keys you need to connect authorize.net to WPorms.click on the setting option, which is present in the left side barf Authorize.Net account.
5. From the setting page then you will need to click on the API Credentials & keys. Finally, you have to copy to API login ID.
Check you are still in the payment tab. Go ahead and paste the key into the API Login ID box. Now you have to go back toAuthorize.Net account .you should still be on the API Credentials and keys page. After this, click obtain, then new transaction key. Then click submit.
6. A PIN is sent to your email address. Now you have a transaction key, and you have to copy the key, switch back to WPForms and paste it into the transaction key field. Finally, click on the Save button.
7. Create your authorize.net payment form: open up the form in the WPForms builder now. It comes with 100+ form templates. Click one by clicking WPForms >>add new. Click n template, and WPFORMSwil open the form builder. After finishing customizing the form, you can turn on payments.
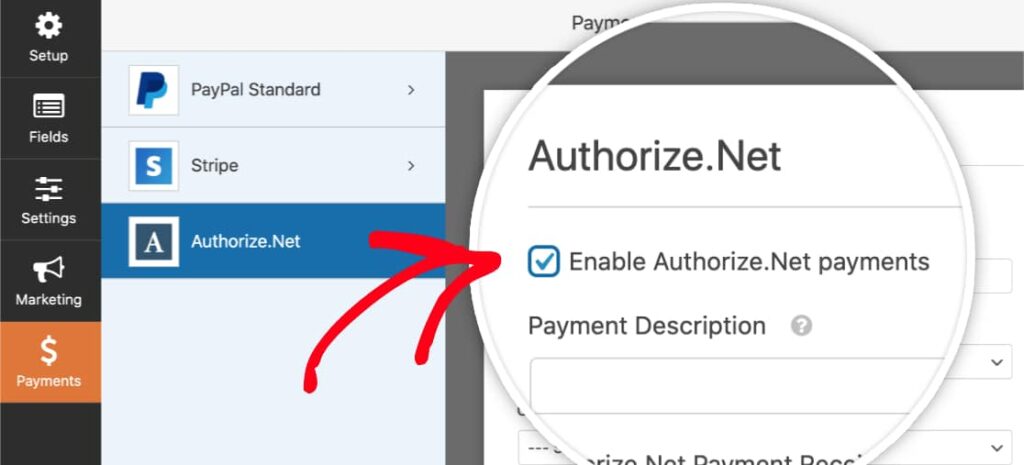
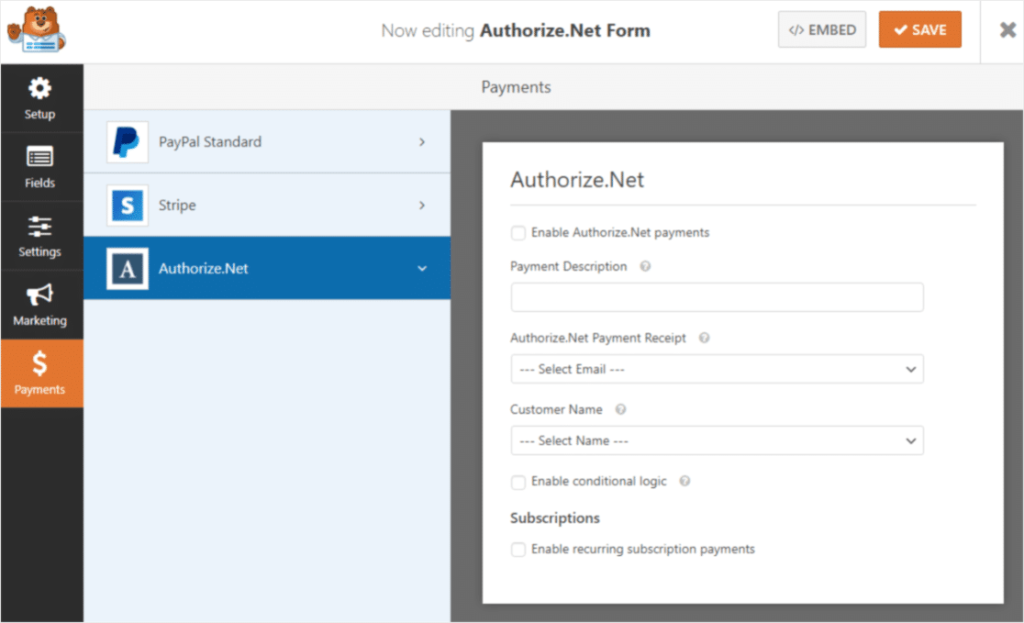
8. Customize your payment form settings: click on payment which is on the left side. After this, click on Authorize.Net. Now you can switch on credit card payments. You have to do the following things:
- Click the enable authorize.net payments.
- In the payment description box, type the words which appear on the customer’s credit card statement.
- In payment receipt, you can select an email to have Authorize.Net send an email receipt.
- Select a name in the customer name dropdown to have the customer’s name associated with the payment.
- Click on save to save your form.
9. Publish your authorize.net payment form: you can now publish your form in WordPress without any code. You can start taking orders using your new Authorize.Net payment form.
Conclusion:
So Authorize.Net provides you with a payment gateway and numerous ancillary services to support that gateway. With broad support among merchant account providers included free of charge, we highly recommend the Autorize.Net payment gateway for eCommerce businesses.